Tag Archives: Japanese

Oyakodon

Standard

I tried cooking oyakodon last night and was impressed by the tasty results from such simple ingredients. The recipe I tried was from justonecookbook but i think I would like to try this one next time instead, so I’m putting this here as a reference.

Oyakodon Recipe

Prep Time: 5 minutes

Cook Time: 15 minutes

Yield: 1 serving

Ingredients

  • 1/4cup (60ml) Dashi
  • 1/2 Tbsp sugar
  • 1/2 Tbsp Sake
  • 1 Tbsp soy sauce
  • 1/2 Tbsp Mirin
  • 1/4 onion, thinly sliced
  • 1 chicken thigh, cut into bite size pieces
  • 1 egg
  • 1/2 green onion, thinly sliced
  • steamed rice

Instructions

  1. Add Dashi, sugar, Sake, soy sauce and Mirin in a pan. Heat until boiling.
  2. Add onion and cook for a minute at medium heat.
  3. Add chicken pieces to the pan and cook until the meat is cooked through.
  4. Beat egg in a small bowl and pour over the chicken and onion. Cover and cook for 30 seconds to 1 minute.
  5. Slide egg and chicken with sauce over rice in a bowl. Sprinkle with green onion.
Mentaiko pasta

Standard

I’ve loved this gourmet looking but deceptively easy to make pasta dish for the longest time. Wonder why I’ve never posted it here. Here are a few links I got my base recipe from.

noobcook
norecipes

Sometimes if it’s just me, I just mix the mentaiko with Japanese mayonnaise and some pasta water to loosen it up. Top it with some seaweed and dinner is served!

Chawanmushi

Standard

Can’t believe I’ve never posted a chawanmushi before when I’ve been cooking it so often. So this is Rasamalaysia’s version.

Ingredients:

4 medium shrimp
4 gingko nuts (optional)
2 inch carrot
3 oz chicken breast
1 teaspoon sake
1 teaspoon soy sauce
2 fresh shiitake mushrooms (thinly sliced, stalks discarded)

For the custard:

3 extra large eggs, beaten
2 cups water*
1/2 teaspoon dashi-no-moto (or equal amount of dashi stock)*
1 tablespoon sake
1 tablespoon soy sauce
1/2 teaspoon salt
Water

*: Ratio of eggs to dashi stock/water is 1:3. The above measurement of water is for reference only.

Method:

Blanch prawns and set aside. Cut the carrot slices into maple leaf shapes. Blanch in salt water and drain. Cut the chicken into small cubes and marinate in sake and soy sauce for 15 minutes.

Put all egg custard ingredients in a bowl and mix with chopsticks and strain into a bowl. Bring a steamer to boil and then set the heat to very low.

Divide the chicken, shiitake, prawns and carrots among four ramekins. Divide the egg mixture among the ramekins. Put the scallion on top and cover each ramekin with aluminum foil. Steam on low heat for 15 minutes. Insert a tooth pick into the egg and if it comes out clear, it’s done.

Read more at http://rasamalaysia.com/chawanmushi-recipe-japanese-steamed-egg/2/#DpvfFzaE8UapDVb9.99

Teriyaki Salmon

Standard

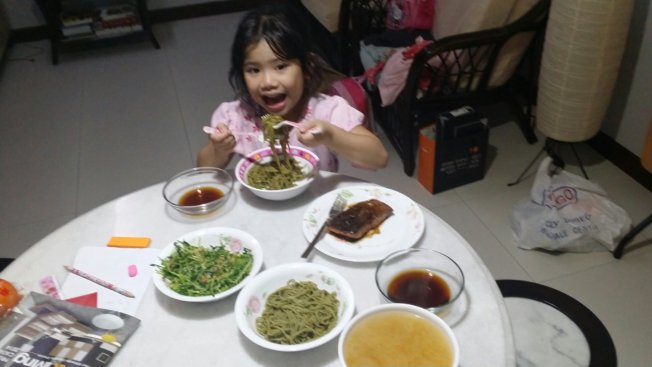
I love to eat salmon and I normally just toast a steak or fillet with salt and pepper. Today, I wanted to do a Japanese food night for my girl, and found this awesome recipe from just one cookbook. And then I went to look at her fabulous recipe page and found so many more treasures that I’m contemplating buying her ebook now. I tried the recipe and it turned out perfect! Here’s the recipe, need to keep it for future use.

Ingredients:

2 salmon fillets with skin (3/4 inch thickness; skin will hold the flesh together while cooking.)
Salt
Freshly ground black pepper
1 Tbsp. flour (* see the note below for why using flour)
½ Tbsp. olive oil
1 Tbsp. butter
1 Tbsp. sake (or dry sherry: I substituted all sake with Hua Diao Jiu)

Seasonings
1 Tbsp. sake (or dry sherry)
1 Tbsp. mirin (or 1 Tbsp. sake + 1 tsp. sugar)
1 Tbsp. sugar
2 Tbsp. soy sauce

Instructions:
1. Combine the ingredients for Seasonings and mix well until the sugar is mostly dissolved (or you can microwave for seconds). Rinse the salmon and pat dry. Season the salmon with salt and black pepper on both sides.
2. Sprinkle 1/2 Tbsp. of flour on one side of salmon and spread evenly. Flip over and sprinkle the rest of flour on the other side. Gently remove the excess flour.
3. In a frying pan, add the olive oil and melt the butter over medium heat. Don’t burn the butter. If the frying pan gets too hot, reduce heat or remove from the heat temporally.
4. Add the salmon fillets, skin side on the bottom. Cook the salmon for 3 minutes, or until the bottom side is nicely browned.
5. Add sake and cover with lid. Steam the salmon for 3 minutes, or until it’s cooked through. Remove the salmon to a plate.
6. Add the Seasonings to the pan and heat up. When the sauce starts to boil, add salmon back in the pan and spoon the sauce over the salmon.
7. When the sauce thickens, turn off the heat. Plate the salmon e on warmed plate and serve immediately. Notes * By coating the fish with flour, we keep nice umami and juice inside. Also, the texture will get crispy and the sauce will be nicely coated.

image All smiles from Japanese dinner night!

Poached Eggs/Onsen Tamago recipe

Standard

Recently, me, Ed and daughter had a nice opportunity to visit Chock Full of Beans at Changi Village, and I got reminded of sinful brunches of Eggs Benedict, like at Riders Cafe (where one of our first few dates commenced =)). As usual, I wondered if I could make it on my own one day. I’ve searched for poached egg recipes, where I didn’t like the idea of swirling my eggs in vinegared, slow boiling water, and I finally found The Easiest Poached Egg Recipe. Then before that, I was very interested in learning how to perfect the art of cooking onsen tamago, and found this video, which I have yet to try, but looks really interesting, as the person who made the video obviously put in alot of effort and thought into making this video! Thank you!

What I’ve learnt about the main difference between poached eggs and onsen tamago is:

1. poached eggs have firmer white, onsen tamago is more like a soft-boiled egg, but slightly firmer than that.

2. poached eggs are most commonly used on toast and smoked salmon, but I had the vegetarian option of having it on Portobello mushroom and toast instead at Chock Full of Beans. Really good!

3. onsen tamago is accompanied with soba dipping sauce, which is similar to the Singaporean/Malaysian style of having soft-boiled eggs with light/dark soy sauce.

I miss brunch food!

Lava Eggs: Ni Tamago

Standard

I’ve always loved eating eggs. In my free time in the past, I’ve done some research on different ways (easy ones, of course) to cook them. I stumbled on this recipe from Wokkingmum, and she explains how to cook the egg in two parts: Part 1, Part 2.

Here is my own explanation of both parts of the cooking process after trying out both recipes.

First of all, you want to boil the eggs before marinating them.

  1. Bring a pot of water to a low boil, gentle bubbling.
  2. Use a spoon to lay the eggs in the pot of water gently, to prevent any cracks in the eggs.
  3. If you are using refrigerated eggs, leave them in the pot for 15 minutes, uncovered. For room temperature eggs, just leave them in for 9 minutes, uncovered.
  4. Remove eggs and place them immediately into a bowl of ice water to stop the cooking process.
  5. Peel off the shells of the eggs gently.

*edit: I found that using room temperature eggs (small ones) at a low boil, you would need at least 9 minutes to make the whites firm enough for easy peeling.

*notes:

  • Adding a pinch of salt to your water helps make the peeling easier.
  • Swirl the eggs around while they are cooking in the pot, so that the yolk does not descend to the bottom and get cooked too quickly.

Next, we move on to the marinade.

Marinade for 2 Lava eggs:
5 tablespoon Light Soy Sauce
3 tablespoon Water
3 tablespoon Mirin
2 tablespoon Brown Sugar
1 teaspoon Superior Dark Soy Sauce

*edit: I realised that the original recipe made my eggs too salty, and has since increased 1 table spoon of mirin and 1 tablespoon of brown sugar for each table spoon of light soy sauce. I also added about half a cup of water to my mixture.

How to do it:

  1. Combine all ingredients in a pot and bring to a simmer.
  2. Once sugar has melted, let the marinade cool completely.
  3. Place 2 lava eggs in a zip-loc bag and carefully pour the marinade into it.
  4. Carefully squeeze all the air in the zip-loc bag out (ie, no air pockets) so the eggs will be completely in marinade.
  5. Marinate for at least 3 hours or overnight.
  6. To serve, drain eggs from marinade and cut into half.

Hotate Mentaiyaki

Standard

20121130-005155.jpg
I’ve made this dish before, and it was great! Found a similar recipe from noobcook.com. Craving for it again!

Ingredients

  • 5 half-shelled scallops if using frozen, thaw before use
  • 60 grams mentaiko sacs aka pollock roe (明太子 )
  • 1 tbsp Japanese mayonnaise
  • 40 grams shredded mozzarella cheese
  • a few stalks hon-shimeji mushrooms ends trimmed; optional

Instructions

1.Remove scallop meat from the shell, rinse the meat thoroughly and remove any dirty bits. Scald the scallop shells in a bowl of hot water for a few minutes to disinfect, discard hot water and rinse the shells. Return scallop meat to the shell.

2.Make a slit on the mentaiko sac and scrap out the roe with a spoon or the back of a small knife. Discard the membrane. Combine mentaiko roe with mayonnaise in a small bowl; stir to combine.

3.Place scallops on a foil-lined oven tray. Bake scallops in pre-heated oven of 200°C for 5 minutes.

4.Using tongs, carefully drain the scallop broth collected in the shells in a small bowl. You may use the broth for flavouring other dishes.

5.Divide and scatter a layer of cheese on top of each scallops, followed by the mentaiko mixture. Garnish each scallop with 1 to 2 stalks of hon-shimeji mushrooms.

6.Return scallops to oven and continue baking at 200°C for 10 minutes, or until the cheese is melted and the edges are slightly browned.

Miso clams

Standard

Another rendition of miso clams, saw it on noobcook. Would love to try it!

  • Serves: 1-2 (as a side dish)
  • Prep: 15 mins
  • Cook: 5 mins

Miso paste is salty and savoury, so there is no need to add salt or light soy sauce. This is an extremely fast recipe as the actual cooking time is less than 5 minutes – overcooking is a no-no and will result in chewy and rubbery clams.

Ingredients

  • 250 grams clams (such as lala, asari, manila)
  • 1 tbsp miso paste to taste
  • 1 tbsp sake
  • 1 tbsp mirin
  • 1/2 tsp sugar
  • 1/2 tsp sesame oil
  • 1 tbsp water
  • 1 tbsp cooking oil
  • 3 slices ginger minced
  • 3 cloves garlic peeled and minced
  • 2 chilli padi de-seeded & sliced thinly; to taste
  • 2 stalks spring onions (only the green part) sliced to 5 cm (2 inch) length

Instructions

  1. Scrub clams with a hard brush, then soak in salted water for at least an hour for the clams to purge out sand and impurities. Drain and rinse clams.
  2. In a bowl, whisk until dissolved: miso, sake, mirin, sugar, sesame oil and water. Set aside miso mixture.
  3. Heat cooking oil in saucepan and add ginger, garlic and chilli. Stir-fry until aromatic, about a minute.
  4. Add clams and miso mixture. Quickly stir with a spatula to coat clams evenly in the sauce, then cover with lid and allow the clams to steam for about 2 minutes, or until all the shells open. Discard any clams that remain closed. Do not overcook the clams.
  5. Turn off the stove. Add spring onions, stir to coat everything evenly in the sauce and serve immediately.

Wasabi Prawns

Standard

Tried cooking a recipe like this one. Got a different recipe to try in future from noobcook.

Ingredients
(serves 2)
Recipe from Tung Lok Group’s cookbook, New Chinese Cuisine (Available at all Tung Lok restaurants and major bookstores), taken from here

– 6 prawns, shelled & deveined (use the freshest, biggest prawns you can find.)
– 1 egg white
vegetable oil for deep frying
– 3 tbsp cornflour
– 90ml mayonnaise
– 1 tbsp condensed milk
– 1 tsp wasabi powder (can put more if you want more wasabi kick)
– dash of lemon juice
– Ebbiko (prawn roe) or Tobiko (flying fish roe)

Directions
1. Dip the prawns in egg white, then coat evenly with cornflour.
2. Deep fry the prawns in 180C (356F) for about 3 minutes, until prawns turn crispy.
3. In a separate dish, combine the mayonnaise, condensed milk, wasabi powder and lemon juice.
4. Toss the deep-fried prawns with the wasabi mayo until evenly coated.
5. Garnish with ebbiko/tobiko and serve.